Import Data
The import data task allows you to import raw hardware and software data extracted from a software discovery tool. The data must be held in .XML files before it can be imported.
When importing data, the import files must be imported in chronological order. Once a file has been imported on or for a specific date, you cannot import a file for an earlier date.
The import data task allows you to import multiple .XML files. License Manager identifies the type of data held in each file, e.g. .EXE audit data, ESI audit data, user account and Active Directory data, device data, metering data, install summary data etc. Please note, if ESI and.EXE audit data is imported, the data is automatically combined.
When an asset is identified by multiple software discovery tools, the data for that asset is prioritized by which tool it was discovered by. This is used to resolve any potential conflicts. The priorities for the software discovery tools are defined in the Data Origin Dictionary
- Click Import Data in the tasks list. The import data window is displayed.
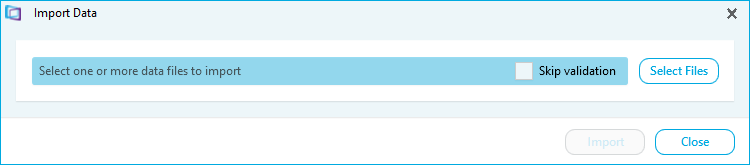
- Tick Skip validation to skip the file validation process when files are selected for the import
- Click Select Files.
- Navigate to where the documents are stored. Select them and click Open. The files are identified in the import data window.
- Select the import option for the data.
- Tick Override Install Sources to override the install source information for ESI and EXE import files. The install source column is added to the Import files table. Select the install source.
- Tick Auto-generate business units to generate any new business units from hardware data. The devices are placed in the root business unit If none are specified in the import file.
- Tick Override Import Date to override the import date. Type the data you want to apply to the data
- Tick Apply Suites/Rules to apply suites to the import data after it is imported. Click Select Files, browse to where the suites and rules files are saved, select them and click open.
- Click Import. A confirmation message is displayed.
- Click OK. The results of the data import are displayed. This allows you to browse through the process and review any problems
- Click Close. The data has been imported.
Please note: The Match All task is automatically performed when EXE data is imported. Any previous edits to device and user details are also re-applied